Do not squeeze a hydraulic disc brake lever while the wheel is out of the bike. With no rotor in the caliper, the pads can be pushed together so far that the rotor no longer fits between them. Park Tool, Shimano and SRAM all warn against it. A pad spacer prevents the problem, and a pad spreader or a shop visit fixes it.
What happens inside the caliper
Three terms first. The rotor is the metal disc fixed to the wheel hub (the 6-bolt ISO pattern is a common fitting, and Shimano also uses its own Centerlock fitting). The caliper is the housing fixed to the frame or fork that straddles the rotor. Inside the caliper, pistons push the pads against the rotor when you pull the lever.
Hydraulic calipers take up pad wear by themselves. SRAM explains that the pistons creep outward to make up for pad material that has worn away, and Shimano says its design sets the rotor-to-pad gap automatically, with the pistons easing outward bit by bit. The self-adjustment is useful, but it is also the cause of the trouble.
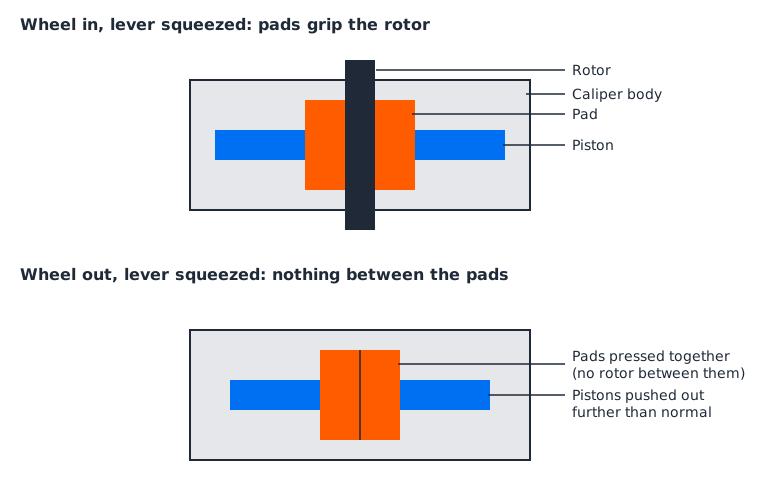
With the wheel in, the rotor sits between the pads and stops them. With the wheel out, a lever squeeze has nothing to stop. Shimano’s dealer manual warns that a lever pull with no spacer in the caliper pushes the pistons out past their usual resting point. SRAM says the pistons then reset to a spacing too tight for the rotor, and Park Tool says the pads close up and the wheel becomes a struggle to refit.
The caliper does not reset itself afterward. SRAM warns that the wheel may not go back in until the pistons are pressed back by hand to make room for the rotor.
Does it apply to cable-actuated discs?
The sources differ in scope. Park Tool limits its warning to hydraulic brakes, and notes that disc brakes need no pad disengagement when you remove a wheel, unlike rim brakes, where its wheel-removal steps include disengaging the brake release. Canyon’s manuals state the rule more broadly: leave the brake levers alone once the wheels are off, because the pads would be drawn together and the wheel gets harder to put back. Sheldon Brown explains that hydraulic discs adjust themselves, while a cable-operated disc relies on a screw to set the pad spacing.
That makes hydraulic brakes the documented risk, but leaving any disc lever alone with the wheel out costs nothing, so make that the habit and defer to your brake maker’s manual.
Prevention: a lever you leave alone, and a spacer
| Situation | What the manufacturers say |
|---|---|
| Wheel out briefly, such as a roadside flat | Do not pull the lever. Shimano’s dealer manual tells shops to warn owners not to depress it while the wheel is removed. Nothing has to be released first on a disc brake, so there is no reason to touch it. |
| Wheel out while the bike is moved, loaded into a car or handled by others | Fit a pad spacer. Shimano recommends spacers whenever the wheel is removed, SRAM suggests installing a pad spreader when traveling with the wheel off, and Canyon says to fit the transport locks supplied with the bike once the wheels are off. |
| Refitting the wheel | Take the spacer out, install the wheel, then confirm the rotor is not fouling the pads. That is the order in Shimano’s dealer manual. |
| Choosing a spacer | Use the one made for your brake. SRAM notes that the plastic spacers come with new brakes, so keep the ones supplied with your brakes in your repair kit. |
If a puncture is why the wheel is coming out, Flat Tire? Here Is Exactly What to Do covers the repair, and What to Do If You Get a Puncture on the Way to Work covers doing it on a commute.
Do not carry the bike upside down
Flipping a bike onto its saddle and handlebars is a common way to get a wheel out. Canyon’s mountain bike manual puts it bluntly: “Never transport bicycles with disc brakes upside down.” The stated reason is that air could get into the brake system and leave the brakes unable to do their job. Its road manual names brake failure as the risk of carrying the bike on its saddle and handlebars, and separately cautions that a carrier holding the bike face down subjects the handlebars, stem, saddle and seat post to severe strain.
These are one manufacturer’s transport notices; they give no time limit for inversion, and other brands may word the warning differently. If your own manuals are silent, keep the bike upright where you can, and treat any soft lever afterward as a brake fault.
If the pads have already closed
- Stop pulling the lever. More squeezing will not reopen the gap. SRAM says that takes pressing the pistons back by hand.
- Use a pad spreader. Park Tool recommends a “purpose-built pad spreader”, and SRAM describes the plastic spacer supplied with new brakes as the tool for returning the pads and pistons.
- Know where the manufacturers draw the line. Shimano’s dealer manual tells shops to advise owners to consult the place of purchase if the pistons have protruded. The same manual adds two cautions for whoever pushes them back: use a flat tool and never a sharp one, which could damage the pistons, and fit an oil funnel to the lever first, which Shimano says shields the lever’s diaphragm from oil pressure. A funnel requirement, or any doubt about your tools, is reason enough to use a shop.
- Refit and check. Install the wheel and confirm the rotor is not fouling the pads. If it rubs, SRAM explains that squeezing without a spacer or rotor can shrink the pad gap, which may leave the rotor too little room to spin cleanly. SRAM publishes a pad-gap reset for its own brakes. Follow your brake maker’s version, or have a shop do it.
- Test the lever before you ride. Canyon’s pre-ride check is that the brake responds distinctly while the lever is still clear of the handlebar. Check with the bike held still, then at walking pace somewhere safe, before riding normally. The 5-Minute Pre-Ride Checklist fits this into a routine.
When to stop riding and see a professional
- The pads or pistons will not go back with a spreader. Do not force them with a sharp tool.
- The lever feels spongy (soft and squashy) or travels toward the handlebar after the wheel is back in. SRAM says that if function or excessive lever throw does not improve, the system must be bled, so take the bike to a mechanic rather than riding it.
- You see fluid at the caliper, hose or lever, or a hose is bent. Canyon says to contact an expert for leaks or bent hoses.
- The rotor still rubs after refitting and the brake maker’s gap procedure does not fix it.
- The lever feels soft after the bike was carried upside down.
For the wider job of checking and servicing brakes, see How to Service Your Own Brakes (Rim and Disc).
Sources
- Park Tool: Wheel Removal and Installation
- Shimano: Dealer’s Manual DM-MADBR01-08, Hydraulic Disc Brake
- SRAM: 9 Important Things to Know About Road Disc Brakes
- SRAM: Road AXS and XPLR AXS User Manual
- Canyon Bicycles: Mountain bike manual
- Canyon Bicycles: Road bike manual
- Sheldon Brown: Bicycle Disc Brakes
Last reviewed: October 2026.