Descend faster by finishing your braking before the corner, keeping your weight low and your arms loose, looking through the turn to its exit, and pressing your weight into the outside pedal. Speed comes from smoothness and control, not from braking late.
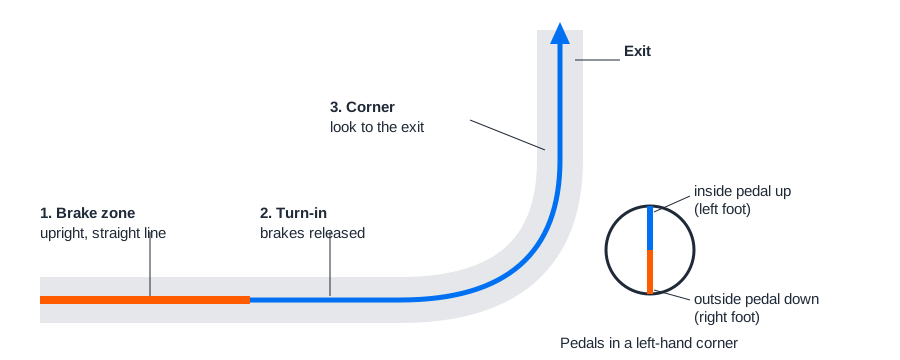
Brake before the corner, not in it
A tire has a limited amount of grip, and cornering already uses much of it. Roadman Cycling says braking hard while leaned over is what makes tires lose grip and wash out, and Polygon calls hard mid-corner braking “one of the fastest ways to lose front-wheel grip.” A club-ride guide adds a second effect: grabbing the front brake in the turn tends to stand the bike up, so you run wide. Three independent writers land on the same rule, which is to do your slowing on the straight, while the bike is upright.
- Use both brakes. The front gives most of the stopping power (Roadman puts it at roughly 70%), so do not avoid it, but squeeze it progressively. Polygon’s phrase is “feather the brakes, never grab.”
- Do not drag the brakes on a long descent. Constant braking overheats rims or rotors and fades braking power. Brake in bursts on the straights between corners, then release and let the bike run.
- Slow before the hazard. Wet or oily patches, sand and gravel cut grip, so scrub speed before them, ride straight through, and turn once you are past.
Hand position and body position
The drops (the lower part of drop bars) are the recommended place for hands on a descent. Roadman notes most amateurs use the hoods because they feel natural, yet the drops lower your center of gravity and give better brake leverage. Polygon says staying on the hoods limits braking power and stability.
Sources word weight distribution differently: Roadman says low and back, Polygon says centered and not pushed heavily onto the bars, and the club guide says about 50/50 between the wheels. The common thread is a low, balanced position with bent elbows that does not lean on the handlebars. Polygon lists “death-gripping the bars,” “locked arms” and shallow breathing as signs of tension; if you notice them, ease off the speed and relax your grip before continuing.
Where to look
Your bike tends to go where your eyes go. On straights, look well ahead (Roadman suggests 15-20 meters, about 50-65 feet), and the faster you go, the farther ahead you need to look. In a turn, look through the corner to the exit. Staring at a pothole or gravel patch makes you steer toward it.
Pedals and hands through a corner
Through a turn, keep the outside pedal at the bottom and put your weight through it. In a left-hand corner that is the right pedal, with the left pedal up. Roadman adds light pressure on the inside hand (the inside end of the bar) so the bike is pressed into the road; treat that as a refinement once the basics feel automatic. Advice to keep pedals level at 3 and 9 o’clock in corners conflicts with all three sources, so do not use it.
Set the bike up first
- Tire pressure: stay within the range printed on the tire sidewall and the rim’s limit, and adjust for your weight and the surface. The tire pressure guide explains the trade-offs.
- Brakes: pads with plenty of material, cables or hoses in good order, and levers that stop well before the bar. See the pre-ride checklist.
If your brakes feel spongy or squeal constantly, or you see cracked tires or a loose wheel or stem, do not ride the descent; have a mechanic check the bike. The brake guide covers what you can inspect.
Wet roads and public roads
Roadman says wet roads reduce tire grip significantly, particularly on painted lines, manhole covers and metal surfaces, and advises braking earlier and more gently, taking wider lines and reducing speed by 20-30% compared with dry conditions. Treat that figure as one coach’s guideline, not a rule for every bike. More in cycling in the rain and basic rules of cycling on roads.
On open roads you stay on your own side and leave a margin in case a vehicle is coming the other way. If you cannot see through a corner, slow down, because you cannot ride a line into a bend you cannot read.
Building speed safely
Pick a familiar, quiet descent and work on one skill per ride: braking points first, then eye position, then pedal loading. Raise your speed only when the last step felt easy. If you feel unsure, slowing down is the skill.
Sources
- Roadman Cycling: How to descend safely on a road bike
- Roadman Cycling: How to descend faster on a road bike
- Polygon Bikes: How to Descend Safely on a Road Bike
- Gainesville Cycling Club: Safe Descending
Last reviewed: October 2026.