Learn balance before pedaling. Lower the saddle until both feet sit flat on the ground, push the bike along with your legs, and only add pedals once you can coast with your feet up. Pulling the two skills apart lets you practice each one on its own.
Why balance comes first
Staying upright on a moving bike is a balance task, and pedaling adds a second job (circling your legs, starting from a standstill) on top of it. Separating them lets you focus on one at a time. If your feet are already on the ground, a wobble costs you nothing, and your body learns the corrections quickly.
Before you start
- Pick the place. Cycling UK recommends a traffic-free area with firm ground, such as a tennis court, playground or grassy park. A smooth, empty paved area with a very gentle slope is ideal for step 3.
- Set up the bike. Lower the saddle so you can sit and place both feet flat on the ground. This is temporary. You will raise it later.
- Pedals. Cycling UK notes it can help to have the pedals taken off at first so they do not bang your legs. If you are not confident with tools, ask a bike shop to do it and to refit them.
- Helmet. If you wear one, see how helmets work and how to choose one. Never carry it hanging from the handlebar, because the straps can catch in the front wheel.
The sequence
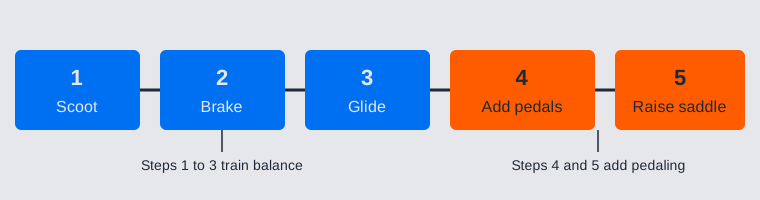
1. Scoot
Sit on the saddle and walk the bike forward, a bit like walking astride it. Take longer strides as you get comfortable. Keep your head up and look where you want to go, not at the wheel.
2. Add the brakes
Once you scoot with confidence, practice stopping. Cycling UK says to squeeze both levers gently and together. Resting your fingers over the levers, ready but not pulling, is a good habit. Learn which lever works which wheel. Hong Kong’s Transport Department gives a different order for normal riding: rear brake first, then the front, because the front brake is the more powerful one. Hard front braking can stop the bike abruptly and lift the rear wheel, which can throw you off balance. Hong Kong’s guidance also says to use both brakes together for emergency stops. Brake only while the front wheel points straight ahead.
3. Glide
Build speed gradually, then try short stretches with both feet just off the ground. A very gentle slope helps. Aim to hold a line and steer where you want to go, without sharp turns, and slow down with the brakes. When you can glide a few seconds in a straight line and steer a gentle curve, you have the balance skill.
4. Add the pedals
With the pedals refitted, put your preferred foot on a pedal at about the two o’clock position, push off with the other leg and press down. As you move, place your other foot on its pedal. Keep the handlebar straight without leaning on it, look ahead, and keep your back as straight as you can.
Two sources differ slightly here. Cycling UK uses short freewheeling as a learning drill. Hong Kong’s guidance for riding says to keep pedaling even at low speed rather than freewheel. Both make sense: glide to learn balance, then pedal smoothly once you are riding, using the balls of your feet.
5. Raise the saddle
A saddle low enough for scooting is too low for pedaling, because it limits leg extension. Cycling UK describes a correct height as one with a very slight bend at the knee when the foot is at the bottom of the pedal stroke. A practical approach is to raise it in small steps over several sessions. If you want the full method, read how to adjust your saddle height and how to fit a bike properly. Expect to feel less secure as the saddle rises. That is normal, so make small changes and stay in your empty practice area.
Common problems
| What happens | Likely cause | Try this |
|---|---|---|
| Bike wobbles side to side at low speed | Too slow, or gripping the bars hard | Suggestion: roll a little faster, loosen your arms and look ahead |
| You steer toward what you stare at | Looking at the ground or an obstacle | Suggestion: pick a point far ahead and look at it |
| You lurch forward when stopping | Grabbing the front brake | Squeeze progressively: Cycling UK says both levers together; Hong Kong guidance says rear first, then front |
| You cannot start without wobbling | Pedal not in the starting position | Set the preferred foot at about two o’clock, push off firmly |
| Stopping feels harder than expected | Wet or loose surface | Practice on dry ground; wet surfaces make stopping more difficult |
When you are ready for roads
Do not leave your practice area until balancing, steering, starting and stopping are all good enough that you can concentrate on traffic. That is the standard Hong Kong’s Transport Department sets for new riders, and it applies anywhere. Before then, also practice moving off in a low gear, bringing the bike to a stop smoothly in a chosen spot, and stopping quickly with both brakes together.
Then build up slowly. For someone who has not cycled in a long time, Cycling UK suggests starting with around five miles (about 8 km) on a traffic-free trail or park, then adding distance, and describes “little and often” as the best way to gain strength and confidence. Our guides to beginner routes, the first 30 days of cycling and basic road rules pick up from here.
Stop and get help if
- The brakes feel weak, squeal badly, or the levers pull to the handlebar. Have a bike shop check them before riding again.
- The handlebar, wheels or frame look bent or cracked, or anything feels loose. Do not ride it.
- You fall and hit your head, or have pain after a fall. Seek medical advice.
- Fear stops you from progressing. An adult learn-to-ride session is a reasonable next step. Cycling UK runs Learn to Ride sessions as part of its Big Bike Revival programme.
Plenty of riders have tried to put the feeling of those first easy miles into words, and Sms4Smile collects some of them on a short page of cycling quotes.
Sources
- Cycling UK: Learning to ride a bike
- Hong Kong Transport Department: Safe Cycling
- Cycling UK: Cycling tips, 24 essential pieces of riding advice for beginners
Last reviewed: October 2026.