Bikepacking is self-supported, multi-day cycling in which you carry sleeping and riding gear in soft bags strapped directly to the bike instead of in rack-mounted panniers. Your first trip can be a single night close to home. The skill is learning how a loaded bike behaves and what you actually use, and a short trip is the cheapest way to find out.
Bikepacking and cycle touring: a blurry line
The two overlap heavily. Cycling UK quotes one editor’s view that touring and bikepacking are “two sides of the same coin”, and notes that “Bikepacking is thus an old label for an even older activity.” The practical differences are mostly about luggage and terrain:
- Luggage: a touring bike “is designed to carry more luggage in panniers.” Cycling UK describes bikepacking as involving “less luggage, which is strapped directly to the bike”, which saves weight and centralizes the load to improve handling off-road. Bags sit on the frame, handlebar and seat area instead of on racks.
- Bike: a bikepacker “might use a cyclocross bike, a fat bike, or a full-suspension mountain bike”, but you can go bikepacking on any off-road-capable bike, touring bikes included, and tour on any bike comfortable enough to carry some luggage.
- Luggage choice: if you want to carry more or ride mostly on pavement, read Cycle Touring Luggage: Panniers vs Bikepacking Bags before buying.
Do you need a special bike?
Not at first. One beginner guide states that “Most bikes can be adapted for bikepacking”, and advises comfort for long days and wider tires for mixed terrain. A gravel or mountain bike is the common choice for unpaved routes; see Gravel Biking: What It Is and Why Cyclists Love It and Gravel Tires Explained. Check that the frame has enough clearance and mounts for the bags you plan to use, since bag fit differs between frame sizes.
The bag layout and what goes where
Trekitt describes the main bag types this way: frame bags use the main triangle of the bike, seat packs give storage without a rack, and handlebar bags suit lightweight items such as sleeping gear or extra layers. The rule that matters is to keep heavier items low and centered. Pedal Cover says frame bags, seat packs and handlebar rolls are popular for keeping weight balanced and the bike nimble.
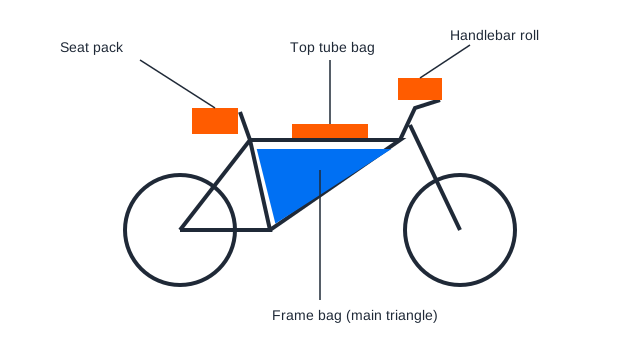
- Frame bag: fills the main triangle. Trekitt puts heavier items such as the tent, sleeping bag and food here, close to the bike’s center of gravity.
- Handlebar roll or bag: lightweight items such as sleeping gear or extra layers.
- Seat pack: lighter gear such as clothing.
- Top tube bag: things you want without stopping, such as snacks, a rain jacket or the repair kit.
Good weight distribution is “crucial for stability and comfort”. After loading, shake the bike and push down on each bag: anything that shifts or sags should be repacked or tightened before you leave.
Planning a first trip
Keep the route simple. One guide advises new riders to choose “a more straightforward, flatter route”, and to keep days to around 30-50 miles (48-80 km) depending on fitness. Treat that as a starting range from one guide, not a rule: terrain, load and weather change what is realistic, and a hilly gravel day can take far longer than the same distance on pavement.
- Start close to home. Try an overnight trip near home and do a shakedown ride with the loaded bike to check comfort and handling. Packing and repacking at home avoids stress on the trail.
- Check camping rules. Pedal Cover states that wild camping is restricted in most of England and Wales but generally permitted in parts of Scotland. Rules differ by country and landowner, so confirm the rules for your route and book a campsite if you are unsure.
- Plan water. Knowing where you can get water on the route is among the most important planning factors. Also note shops and cafes so a missed stop does not become a problem.
- Carry food with a buffer. Most bikepackers carry lightweight, non-perishable food such as dehydrated meals, trail snacks or energy bars. See Cycling Nutrition for fueling basics.
A starter kit
Exact weight depends on season, shelter and bike, so use your own shakedown ride as the test: if the bike feels sluggish or the bags sway, remove things. A summer overnight list typically covers:
- Shelter (tent, tarp or bivvy bag), sleeping bag suited to the expected night temperature, and sleeping mat
- Spare tube, tire levers, multi-tool and pump; know how to use them first, using Flat Tire? Here Is Exactly What to Do and How to Prevent Punctures
- One set of dry non-riding clothes and a rain jacket
- Food, water capacity for the longest gap between refills, and a charged phone with offline maps
After each trip, note what you never used and what you wished you had. That list is your personal kit.
Before you leave: safety checks
A loaded bike is harder to stop and corner, and a failure far from help costs more. Run the pre-ride checklist and confirm bags do not touch tires, brake rotors or cables. If brakes feel weak or spongy, a wheel is damaged, or the frame or fork shows a crack or dent, do not ride; have a bike shop inspect it.
Sources
- Cycling UK: What’s the difference between cycle touring and bikepacking?
- Trekitt: How to Start Bikepacking
- Pedal Cover: How to Start Bikepacking: The Complete Beginner’s Guide
Last reviewed: October 2026.