Start with the chainring bolts. Park Tool puts them first on its list of checks for a wobbling ring, and they take minutes. If the wobble survives correctly tightened bolts, one of three parts is bent: the bottom-bracket axle, the spider or the ring itself. A short sequence of tests tells you which.
What wobble is and why it wrecks front shifting
A chainring (Sheldon Brown says chainwheel) is the toothed ring that drives the chain; our gearing guide covers how it pairs with the cassette. The spider is the multi-armed part that holds the rings to the crank, and the bottom-bracket axle (spindle) is the shaft the cranks turn on. Wobble means the ring’s edge swings side to side as the cranks turn instead of running in one flat plane.
Sheldon Brown says chainwheels should run perfectly straight and true, especially on bikes with indexed front shifting, and that it should be possible to get them within 1 mm (about 0.04 in) or less. Park Tool adds the consequence: extreme wobble makes front shifts inconsistent and limit and index adjustments hard to set.
To see it, put the bike in a stand, turn the cranks slowly and watch the ring’s outer edge against something fixed, such as the derailleur cage or chainstay. A bent tooth is a different fault: Park Tool says it is audible and can snag the chain. If shifting is poor but the ring runs flat, see why your bike shifts badly.
Step 1: Tighten the ring bolts correctly
Park Tool’s first advice is to confirm that every mounting bolt is snug, bearing in mind that chainring bolts need far less torque than a crank bolt. Crank-bolt force on a small bolt invites a stripped or snapped fastener. Use a torque wrench set to the value printed on the bolts, as BikeRadar advises, or to the figure in your crankset maker’s instructions.
If your cranks use traditional bolts with a separate nut behind the ring, hold the nut still with a chainring nut wrench or a second hex key while you turn the bolt. Work around the ring in small steps. BikeRadar’s method is to snug every bolt until the rings are held, then go round the bolts a quarter turn at a time until all are tight.
Park Tool also lists a loose bottom bracket bearing as a possible source of the movement, so check it; a creak under load can come from the bottom bracket too. Spin the cranks again: if the edge runs flat, the ring was simply loose; if not, move on.
Step 2: Find the bent part, in this order
Sheldon Brown warns that straightening the wrong part means “bending a good part to make it fit a bad part”, which compounds the problem. He starts with the axle: a bend there is unlikely, but it is the first thing to rule out.
Axle: the crank-flip test
- Mark the part of the outer ring that sits farthest out as the cranks turn.
- Remove the right crank from the axle, using the extractor made for your crank type, and refit it 180 degrees from its original position so it faces the same way as the left crank.
- Spin the cranks and see which part is now farthest out.
- Refit the right crank in its normal orientation and tighten it to the maker’s specification.
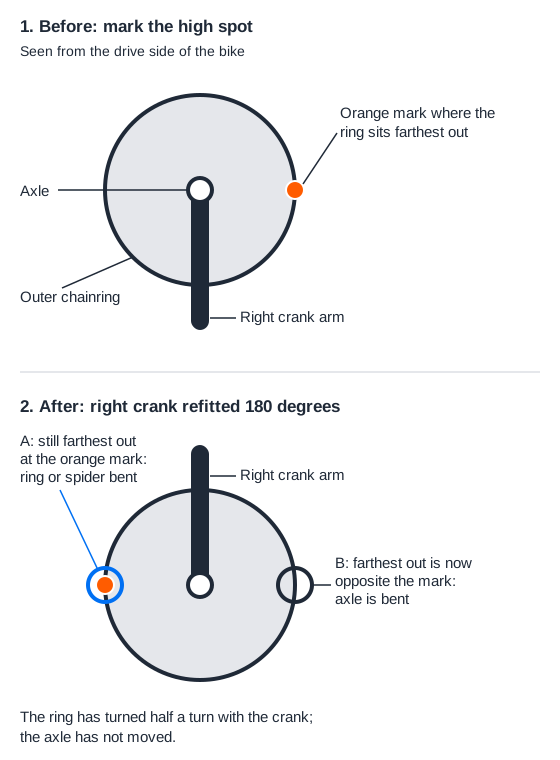
If the marked part is still farthest out, the high spot stayed with the ring, so the axle is cleared. If the high spot is now opposite the mark, it followed the axle: Sheldon Brown says the axle is bent and needs replacing.
This test needs a crank that can come off and go back at a different angle. According to Wikipedia, some newer designs have the axle permanently attached to one crank: the right (Shimano and others) or the left (Race Face). If it is fixed to the right crank, there is nothing to flip. Skip to the spider check, and if the wobble persists, see a shop.
Spider: the clothespin check
Remove the chainrings. Clip a spring-type clothespin to the front derailleur cage and use the shifter to bring its tip close to the spider arms, almost touching as they pass. A bent spider shows up quite clearly on that indicator.
What to do about a bent spider depends on the crank. Wikipedia says the most common modern cranks integrate the spider into the drive-side crank arm, and names Middleburn, TA and Surly as makers of cranks with separate, detachable spiders. Sheldon Brown describes straightening a spider with an adjustable wrench, but his page carries 1997 and 2008 copyright dates. On a crank with an integrated spider (the most common modern design), a bent spider is a bent crank arm, a load-bearing part: replace the crank or take it to a shop rather than bending it back. If your spider is detachable, replace the spider.
Ring: what is left
If the axle and spider test straight, Sheldon Brown concludes the rings themselves are bent. The sources then differ. Park Tool says that if the chainring is bent, replacement is the best option. Sheldon Brown says bent rings can sometimes be straightened, and had his best success with the ring bolted back onto the spider. Treat straightening as a last resort for a ring you were about to discard; replacement is the sensible default.
Reading the results
| What you see | What it points to | Next move |
|---|---|---|
| Ring runs flat after even, correct tightening | Loose ring bolts | Retest after a ride; recheck front derailleur setup |
| After the flip, the high spot is opposite the mark | Bent axle | Replace the axle or have a shop do it |
| Clothespin shows uneven spider arms | Bent spider | Integrated spider: replace the crank; detachable spider: replace the spider |
| Axle and spider straight, ring still swings | Bent ring | Replace the ring |
Replacing the ring
- Check that it can be replaced. On some cheaper cranksets the rings are welded or riveted on rather than bolted (Wikipedia). A bent ring on one of those cannot be swapped on its own, so the fix is a new crankset.
- Match the spider. A replacement ring has to match the spider’s number of bolt holes and how far apart they sit. That spacing is the bolt circle diameter (BCD).
- Fit the pin correctly. The outer ring usually has a small pin on its face. BikeRadar says to line it up behind the crank arm, where it helps keep an over-shifted chain from wedging between ring and arm.
- Recheck the front derailleur. Park Tool says changes to chainring size may or may not leave the derailleur compatible, so check alignment afterward; BikeRadar says a different outer ring size may mean adjusting its height.
When to stop riding and see a shop
- You see a crack, a deep gouge or a kink in a crank arm, spider arm or axle. Do not ride it.
- The wobble returns after you tighten the ring bolts to the printed torque.
- The crank moves on its axle, or the bottom bracket feels loose, and tightening does not cure it.
- Your axle is permanently attached to the right crank and the ring still wobbles.
- You lack the right extractor or a torque wrench, or cannot find your crankset’s specification. Crank bolts take much more torque than ring bolts, so do not guess.
Sources
- Park Tool: Front Derailleur — Advanced Troubleshooting
- Sheldon Brown: Straightening Chainwheels
- BikeRadar: How to change chainrings – video
- Wikipedia: Crankset
Last reviewed: October 2026.