To true a wheel, find where the rim strays sideways, then tighten the spokes that pull it back and loosen the ones on the other side by the same amount, in quarter-turn steps. That is the whole method. The skill is in the details: which spokes, how much, and when the problem is bigger than a spoke wrench can fix.
Know the vocabulary first
- Lateral true: the rim runs straight, without wobbling side to side. This is what makes brake pads rub.
- Radial (vertical) true: the rim is round, with no high or low spots (hops).
- Dish: how well the rim is centered between the hub’s two ends.
- Tension: how tight the spokes are. Even tension is what keeps a wheel true.
Wheelbuilding references name the same four things to keep under control: “There are 4 different things that you need to bring under control to complete the job: lateral truing, vertical truing, dishing, and tensioning.” Truing is mostly about the first two, but changing one affects the others, so check all four as you go.
Tools
- A spoke wrench that fits your nipples exactly. A loose fit rounds them off.
- A truing stand, or the bike itself with a fixed reference such as a brake pad or a zip tie fastened to the fork or frame so its end sits near the rim.
- A marker or tape to note the problem area.
Before you touch a spoke
Spin the wheel and find where it moves sideways. A wheel can only be trued if it is basically sound, so check these first:
- Look at the rim around each spoke hole for cracks, and check the sidewalls for dents or deep gouges.
- Look at the hub flanges (the discs the spokes hook into) for cracks.
- Check that no spoke is broken.
A wheel that keeps going out of true without a clear cause deserves suspicion. One experienced wheelbuilder describes a hub that lost true slightly, was trued, and later turned out to have a crack across several spoke holes: “I might better have taken the loss of true as a red-flag warning.” If you find a crack in a rim, hub or spoke hole, or a broken spoke you cannot replace correctly, stop riding the wheel and take it to a shop. A rim with a dent in the braking surface or a bulge is also a shop job.
Which way to turn the nipple
This is the part that trips most people. Park Tool’s rule depends on the viewpoint: looking at a nipple from the outside of the rim, clockwise tightens and counterclockwise loosens. But with the wheel in a stand or on the bike, you see the nipple from the hub side of the rim, so tightening looks like a counterclockwise turn. Sheldon Brown makes the same point about the spoke wrench: you are “working from the back side of the clock.”
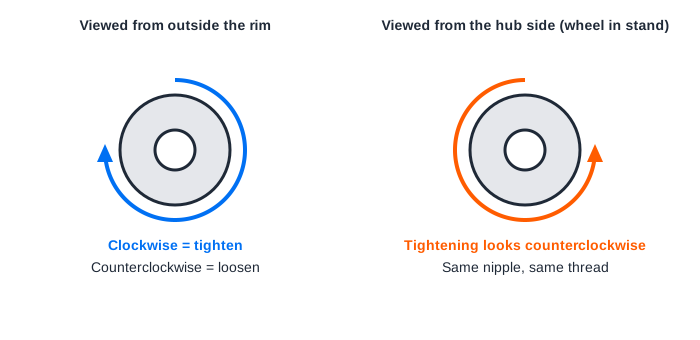
Do not trust your head; test it. Turn one nipple an eighth of a turn and check whether that spoke feels tighter and the rim moves toward its hub flange. If it does the opposite, reverse your direction. Use a wrench that fits the nipple fully, and on bladed spokes hold the spoke so it cannot twist as the nipple turns.
How spokes move the rim
Each spoke runs from one hub flange to the rim. Tightening it pulls the rim toward the side its flange is on. So the rule, from the same guide: “If the rim is off to the left, tighten spokes that go to the right flange and loosen those that go to the left flange.”
Doing both together matters. The guide notes that “If you do the same amount of tightening and loosening, you can move the rim to the side without affecting the roundness of the wheel.”
Lateral truing, step by step
- Spin the wheel and find the spot where the rim is farthest from where most of the rim runs.
- Decide which way the rim has to move. Identify the spokes in that area and which hub flange each goes to (they alternate side to side).
- Apply the correction. The guide’s examples, for a rim that is off to the left:
- If the center of the bend is between two spokes, tighten the right-flange spoke 1/4 turn and loosen the left-flange spoke 1/4 turn.
- If the bend is centered on a right-flange spoke, tighten that spoke 1/4 turn and loosen each of the two left spokes beside it 1/8 turn.
- If it is centered on a left-flange spoke, loosen that spoke 1/4 turn and tighten each of the two right spokes next to it 1/8 turn.
- Spin again. Fix the worst bend on the other side next, then keep alternating. The guide’s advice: “Don’t try to make each bent area perfect, just make it better, then go on to the next.”
Park Tool’s general guideline is a quarter turn at a time, with an eighth for minor deviations and up to a half turn for large ones, and it advises making corrections on both sides of the wheel to keep it centered. Small steps are the point. Big turns in one spot create a new, sharper wobble nearby. On a wheel with very loose spokes, bring the whole wheel up first: the guide says to tighten each spoke one full turn, starting at the valve hole, until the wheel firms up.
Correcting hops
A hop is a high or low spot where the rim is not round. A high spot is pulled down toward the hub by tightening the spokes there, so hops are corrected mostly by tightening, not by the left-right pairing used for lateral work. The guide’s method: “If the center of this high spot is between two spokes, tighten each of them 1/2 turn.” If the high spot is centered over a spoke, it says to tighten that spoke one full turn and the two neighbors that go to the other flange 1/2 turn. It also warns that “It takes a larger adjustment to affect the vertical truing than the horizontal truing,” and that vertical truing is done by tightening spokes, gradually building tension.
Because tightening alone raises overall tension, you may need to correct the sideways position afterward. Sheldon Brown’s advice is to work on the vertical whenever the vertical error is bigger than the lateral error.
Check the dish and keep the tension even
Once the wheel runs reasonably straight, check that it is centered between the frame or fork. Sheldon Brown suggests starting that check once lateral error is within a couple of millimeters. A wheel that is true but off-center will sit crooked in the frame.
Tension matters more than most home mechanics expect. A tensiometer is the best way to measure it, though the guide also mentions plucking spokes and judging pitch, or noting how hard the wrench turns. Two points from the same source:
- Evenness comes first. On a rear wheel with a correctly tensioned freewheel (cassette) side and correct dish, the opposite side ends up quite a bit looser. That is normal, but each side should still be uniform within itself.
- Do not chase tightness. Wrench resistance that makes you worry about rounding off the nipple means you are near the maximum, and modern spokes and nipples can actually be over-tightened, which can cause rim failure.
Stress relief and final check
New or rebuilt wheels need the spokes seated before they hold true. The guide says “Before a wheel is ready for the road, it must be stress-relieved,” because spoke bends settle into the hub flange. Builders do this by squeezing groups of spokes together or flexing the wheel. Park Tool calls a gentle ride on the bike “the safest” way and says a few pings and pops in the first pedal strokes are common; expect some touch-up truing afterward. If a wheel drifts back out of true quickly after you true it, that is a sign of low or uneven tension or something worse, so have it inspected.
Finish by spinning the wheel, re-checking the brake clearance, and testing the brakes at low speed before you ride. If you also touched brake pads while using them as a reference, see how to service your own brakes. Add a quick wheel spin to your pre-ride checklist so you catch a developing wobble early.
When to stop and take it to a shop
- Any cracked rim, hub flange or spoke hole, or a rim with a bulge or deep dent.
- A rim that stays bent even though the spokes on the side that should pull it back are already tight. Park Tool says this means the rim metal is bent and the rim needs replacing, a job best left to a professional mechanic.
- Several broken or very loose spokes. The wheel probably needs retensioning or a rebuild.
- A wobble that returns within a few rides.
- A hop or wobble you cannot reduce after a careful attempt. Stop before you over-tension.
- Disc brake wheels with a rotor that rubs after truing; the wheel may be fine but the caliper or rotor needs adjusting.
If a flat has damaged the rim edge or you are working on tires at the same time, see what to do about a flat tire.
Sources
Last reviewed: October 2026.