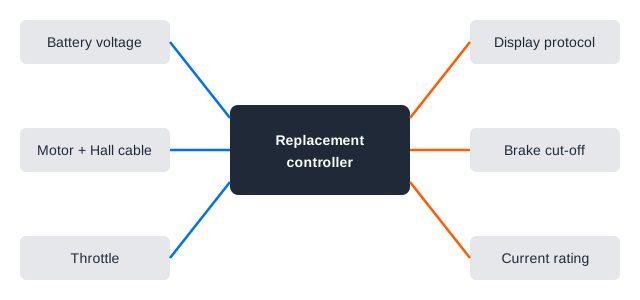
A replacement e-bike controller has to match your battery voltage, your motor type (with or without Hall sensors), the current the system is designed for, and every connector and display protocol on the bike. A mismatch on any of these can leave the bike running poorly or not at all, so confirm each against the manufacturer’s documentation before buying.
What the controller does
E-bikes use rechargeable batteries in addition to electric motors and some form of controller to deliver the power to the motor. In a brushless motor, the controller does the job that brushes once did: it uses an electronic controller to switch DC currents to the motor windings, so the rotor keeps turning. It also reads your throttle or pedal-assist input and the battery state, and decides how much power to send. For how the inputs differ, see throttle vs pedal assist and torque vs cadence sensors.
Rule out cheaper causes first
A controller is rarely the first thing to fail. Before buying one, check these, because several mimic a dead controller:
- Battery and charging. A battery that will not deliver power looks like a dead bike. Start with why an e-bike battery will not charge.
- Connectors. Unplug and reseat the throttle, brake-sensor, display and motor connectors, looking for bent pins, corrosion or water.
- Display. A fault shown on the display may point to a sensor or motor problem rather than the controller. The display guide explains common readings.
- Sensors and motor. A failed Hall sensor or damaged motor cable can stop the motor starting smoothly even when the controller is fine.
Common symptoms that can point at the controller (general experience, not a diagnosis on their own; each has other possible causes):
- The motor does nothing, while the battery shows charge and the display powers on.
- The motor cuts out intermittently or stutters under load.
- The motor starts roughly or jerks from a standstill, which can also be a Hall sensor or motor cable fault.
- The motor keeps running or fails to cut when you squeeze the brake levers: stop riding, because that can also be a brake-sensor or throttle fault.
A motor that stays dead while the battery, display and wiring all check out is a reason to suspect the controller. Burn marks, a hot smell or a deformed housing are signs of heat damage: stop riding and charging the bike and have it inspected by a qualified e-bike technician. Lithium-ion batteries can cause serious fires, particularly if of poor quality, damaged or improperly used, so do not keep charging a bike that shows heat damage.
What a replacement must match
Battery voltage
The voltage marked on your battery and the voltage range printed on the controller’s label should agree; as general practice, treat a “close enough” pairing as a reason to ask the controller’s maker before buying. Great Britain’s official guidance advises using only manufacturer recommended replacement parts, chargers and batteries, and lists modification with non-compatible parts among the things that raise fire risk.
Current limit and power
Electrical power in watts is voltage multiplied by current in amps, so a 48 V system limited to 15 A can draw roughly 720 W, and one limited to 25 A roughly 1,200 W. Keep to the original current rating of the system. In Great Britain, an electrically assisted pedal cycle must have a continuous rated power of no more than 250 watts and must not propel the bike above 15.5 mph (checked October 2026). In the United States, federal law defines a “low-speed electric bicycle” as having a motor of less than 750 watts and a top motorized speed of less than 20 mph, and treats it as a consumer product; individual states set their own rules for where and how you may ride. Other countries differ again, covered in e-bike laws in the US, UK and EU.
Hall sensors or sensorless
A brushless controller must know where the rotor is. Some designs use Hall-effect sensors or a rotary encoder to directly measure the rotor’s position, while others infer it from back-EMF, the voltage the spinning motor generates. Sensorless operation has a weak point at start-up: with a sensorless controller, no back-EMF is produced when the rotor is stationary, so the motor can run backwards briefly before it finds the right phase. If your motor has Hall sensors, buy a controller that explicitly supports them; the motor’s documentation or seller listing says which type it is.
Connectors and display protocol
The table below is general practice, not a manufacturer specification. Pin layouts and wire colors are not standardized, so the controller seller or maker has to confirm them for your exact parts.
| Connection | What to confirm |
|---|---|
| Motor phase wires | Plug type and wire gauge suited to the motor current |
| Hall sensor cable | Pin count and pin order match the motor |
| Throttle | Connector and signal type match the throttle |
| Display | Confirm with the seller that the display model is listed as compatible with the controller |
| Brake cut-off sensors | Connector and signal type match what the controller expects |
The practical rule: buy the controller the seller lists as compatible with your exact motor and display model, and photograph every connector before disconnecting anything.
Branded systems
Bafang, for example, lists its controllers by model code, so the code on your part matters, and other makers may work similarly. If your bike has a branded system, ask that brand or its dealer which controller is approved for your exact bike. See mid-drive vs hub motor for how the two motor layouts differ.
Fitting safely
If your bike has an open, generic hub-motor kit and you are comfortable with electrical work, the sequence below is a general precaution only; defer to the controller manual where it differs:
- Remove the battery from the bike and leave it off. Never work on the wiring with the battery connected.
- Photograph the old controller, its mounting position and every connector, and label them.
- Transfer connectors one at a time to the new controller; every plug should fit without force. If a plug does not fit, stop and get the correct part rather than re-pinning wires.
- Mount the controller where it was, away from moving parts and protected from water, with no wire pinched or chafed.
- Reconnect the battery last, then, as a general precaution, test with the rear wheel off the ground before riding. Follow the controller manual if it specifies another sequence.
Do not open or modify the battery pack or its protection circuit, and use only the charger made for your battery; official UK guidance says connecting the wrong charger to a battery can pose serious fire risks. If the motor spins the wrong way, runs roughly, cuts out, or anything smells hot, disconnect the battery and take the bike to a qualified technician. A bike whose brake cut-off or throttle behaves unpredictably should not be ridden.
Settings after fitting
Some controllers ship with default parameters, such as wheel size for speed readout or a current limit, that may not match your bike. Set them according to the controller manual and keep any speed or power limit within local rules.
Sources
- Wikipedia: Electric bicycle
- Wikipedia: Brushless DC electric motor
- Bafang: Controller
- GOV.UK (Office for Product Safety and Standards): Buy Safe, Be Safe: avoid e-bike and e-scooter fires
- GOV.UK: Electric bike rules
- Cornell Legal Information Institute: 15 U.S. Code 2085, Low-speed electric bicycles
Last reviewed: October 2026.